With the migration of The Things Network to the version 3 stack, I thought it was an opportune time to upgrade my Raspberry PI based gateway from the legacy Semtech packet forwarder to Basic Station.
Basic Station
LoRaWAN gateway maintainers should be using secured and encrypted connections to the LoRaWAN Network Server (LNS) rather than the old legacy packet forwarder using UDP packets.
Semtech provide opensource software called LoRa Basics Station for this purpose:
Basic Station exchanges data as JSON encoded objects over secure WebSockets. The gateway identifies itself with a secret API key, ensuring it’s authorised.
In addition to security, the protocol allows for LNS discovery and load sharing and also includes CUPS or Configuration and Update Server allowing for easy management of gateway fleets.
Installation
These instructions assume you have a functional operating system installed on your PI with network enabled and working. I prefer to use Raspberry Pi OS Lite without a desktop.
You will also require git to be installed. To install, execute:
sudo apt-get update
sudo apt-get install git
The SPI interface port on the Raspberry Pi is normally switched off by default. To enable SPI, you will want to run:
sudo raspi-config
and under (3) interface options, enable (I4) SPI – automatic loading of the SPI kernel module. If you are using a CoreCell concentrator, you will also need to enable I2C – (I5) – automatic loading of the I2C kernel module.
While you are there, we have the GPS module’s TX and RX lines connected to the serial port. The serial port is normally enabled as a console. Disable (P6) shell messages on the serial connection, but leave the serial port hardware enabled.
Now clone the latest version of Basic Station:
git clone https://github.com/lorabasics/basicstation.git
cd basicstation
If you are using a Corecell SX1302/SX1303 based concentrator (RAK5146, RAK2287 etc) build with platform=corecell:
make platform=corecell variant=std
Or If you are using an older SX1301 based concentrator (RAK833, RAK2245, RAK2247 etc) build with platform=rpi:
make platform=rpi variant=std
During the build process, dependencies such as mbed TLS and the libloragw SX1301 and SX1302/SX1303 (Corecell) Driver/HAL are downloaded and compiled.
Configuration
A couple of configuration files are needed to start Basic Station. The good news is, unlike the old packet forwarder, most of the parameters (i.e. the channel plan configuration) are obtained from the LNS. The station.conf file now really only describes the hardware and this shouldn’t change provided the hardware remains fixed.
You will want to keep all the configuration files together. I normally create a folder called TTN in my home directory for this purpose:
cd ~
mkdir TTN
cd TTN
The first thing Basic Station needs to know is what LNS to establish a connection with. Log into The Things Network Cluster Picker and select the closest geographically located server to minimize network latency. Currently the following LNS exist:
- Europe 1: eu1.cloud.thethings.network
- North America 1: nam1.cloud.thethings.network
- Australia 1: au1.cloud.thethings.network
Create a file called tc.uri and populate it with the server name. Packet transport with the The Things Network V3 LNS happens on port 8887.
(CUPS communicate on port 443)
wss://{eu1|nam1|au1}.cloud.thethings.network:8887
Next we need to establish a trust relationship. This involves copying the root certificate (expires Jun 2035) to a file called tc.trust.
curl https://letsencrypt.org/certs/isrgrootx1.pem.txt -o tc.trust
We also need to create a tc.key file to authorise the gateway – more on this later.
Finally, create the station configuration file – station.conf.
If using a SX1302/SX1303 based concentrator (CoreCell) populate station.conf with:
{
    "radio_conf": {                       /* Actual channel plan is controlled by the server */
        "lorawan_public": true,           /* is default */
        "clksrc": 0,
        "device": "/dev/spidev0.0",
        "pps": true,                      /* default SPI device is platform specific */
        "antenna_gain": 0,                /* antenna gain, in dBi */
        "full_duplex": false,
        "radio_0": {
            /* freq/enable provided by LNS - only hardware-specific settings are listed here */
            "type": "SX1250",
            "rssi_offset": -215.4,
            "rssi_tcomp": {"coeff_a": 0, "coeff_b": 0, "coeff_c": 20.41, "coeff_d": 2162.56, "coeff_e": 0},
            "tx_enable": true
        },
        "radio_1": {
            "type": "SX1250",
            "rssi_offset": -215.4,
            "rssi_tcomp": {"coeff_a": 0, "coeff_b": 0, "coeff_c": 20.41, "coeff_d": 2162.56, "coeff_e": 0},
            "tx_enable": false
        }
        /* chan_multiSF_X, chan_Lora_std, chan_FSK provided by LNS */
    },
    "station_conf": {
      "log_file":    "stderr",
      "log_level":   "INFO",
      "log_size":    10e6,
      "log_rotate":  3
    }
}
Or if using an older SX1301 based concentrator populate with:
{
   "radio_conf": {                  /* Actual channel plan is controlled by the server */
       "lorawan_public": true,      /* is default */
       "clksrc": 1,                 /* radio_1 provides clock to concentrator */
       "device": "/dev/spidev0.0",  /* default SPI device is platform specific */
       "pps": true,
       "radio_0": {
           /* freq/enable provided by LNS - only hardware-specific settings are listed here */
           "type": "SX1257",
           "rssi_offset": -166.0,
           "tx_enable": true
       },
       "radio_1": {
           "type": "SX1257",
           "rssi_offset": -166.0,
           "tx_enable": false
       }
       /* chan_multiSF_X, chan_Lora_std, chan_FSK provided by LNS */
   },
   "station_conf": {
     "log_file":    "stderr",
     "log_level":   "DEBUG",
     "log_size":    10e6,
     "log_rotate":  3
   }
}
Further details of the configuration file can be found here.
The only part you are likely to want to change is the log settings. Instead of logging to file, we send the output to stderr for debugging.
The log levels are:
XDEBUG, DEBUG, VERBOSE, INFO, NOTICE, WARNING, ERROR, CRITICAL
When you put your gateway into production, you may want to reduce the log level to notice to minimise ware on the flash memory.
Reset
The SX1301/SX1302/SX1303 Digital Baseband chip should be reset after power-up. However, this initial reset of the SX130x is not performed by Basic Station/libloragw. We have to do this externally and use gpioset that comes with the gpiod.
On my gateway, the SX1303 reset line connected to GPIO25 of the Pi, but it may be different. For example, if you are using a RAK2003/RAK2247 Pi Hat, you will want to use GPIO17.
Install the gpiod package:
sudo apt-get install gpiod
Create the following script and call it reset_gw.sh. Where 25=1, 25 specifies the GPIO pin number.
#!/bin/sh
gpioset --mode=time --usec=500 pinctrl-bcm2835 25=1
gpioset --mode=time --usec=500 pinctrl-bcm2835 25=0
And make the script an executable:
chmod 755 reset_gw.sh
Now we can reset the SX1301 by running ./reset_gw.sh
Testing
Basic Station can be started as a daemon using the -d switch. However, for testing it is best to execute it in the foreground, so you can more easily see what is going on and watch out for any errors.
To start Basic Station complied for Corecell, run:
~/basicstation/build-corecell-std/bin/station --radio-init=./reset_gw.sh
It expects the configuration files to be in the current directory. If they are not, you can specify their location using the –home=dir switch.
If using a device based on the SX1301, you will find the executable in the ~/basicstation/build-rpi-std/bin/station folder.
Registering the Gateway on The Things Network
To register your gateway with TTN, you will need the gateway’s EUI.
The gateway/station’s EUI is made up from the Raspberry Pi’s MAC address and should be shown in the first couple of lines of output when the station starts – for example:
2021-02-15 03:52:20.285 [SYS:INFO] Station Ver : 2.0.5(corecell/std) 2021-02-15 02:15:54
2021-02-15 03:52:20.288 [SYS:INFO] Package Ver : (null)
2021-02-15 03:52:20.288 [SYS:INFO] proto EUI   : 0:b827:eb35:6ab9       (/sys/class/net/eth0/address)
2021-02-15 03:52:20.289 [SYS:INFO] prefix EUI  : ::1    (builtin)
2021-02-15 03:52:20.289 [SYS:INFO] Station EUI : b827:ebff:fe35:6ab9
Log into the console of the cluster you intend to register with and click “Go to gateways“

Then click Add Gateway. The following dialog should appear:

Enter your Gateway EUI into the Gateway EUI field, give your gateway a unique Gateway ID and a suitable name.
Now set the correct frequency plan for your country or location:

And click Create gateway. You should now have an enrolled gateway.
But, not so fast. If you try to connect your gateway now, it is likely to fail repeatedly with the connection being closed by the peer.
[TCE:INFO] Connecting to INFOS: wss://eu1.cloud.thethings.network:8887
[TCE:INFO] Infos: b827:ebff:fe35:6ab9 muxs-::0 wss://eu1.cloud.thethings.network:8887/traffic/eui-B827EBFFFE356AB9
[AIO:ERRO] Recv failed: SSL - The peer notified us that the connection is going to be closed
You need to add an API key to authorise your gateway.
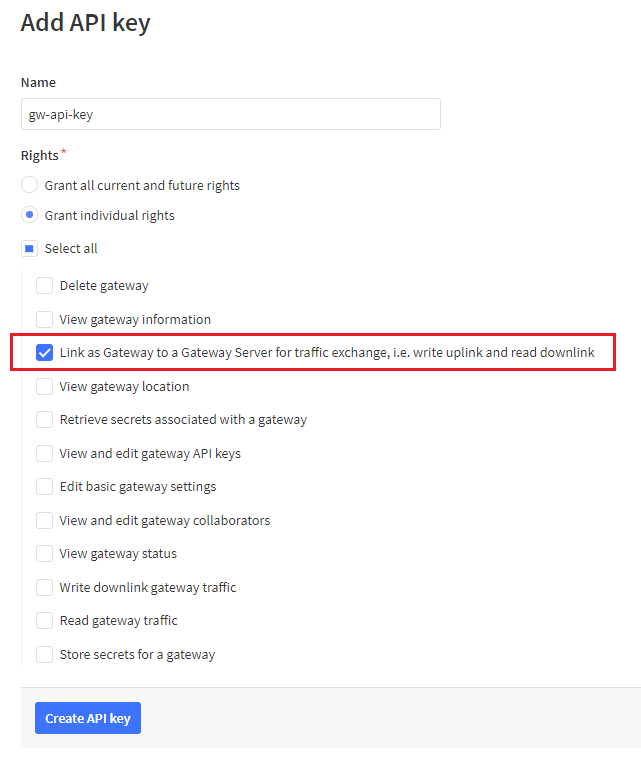
Click API keys and then + Add API key (in the top righthand corner).

Give your API key a name and change the rights to grant individual rights to “link as Gateway to a Gateway Server for traffic exchange, i.e. write uplink and read downlink” as per the example below. Then click Create API key to create it.

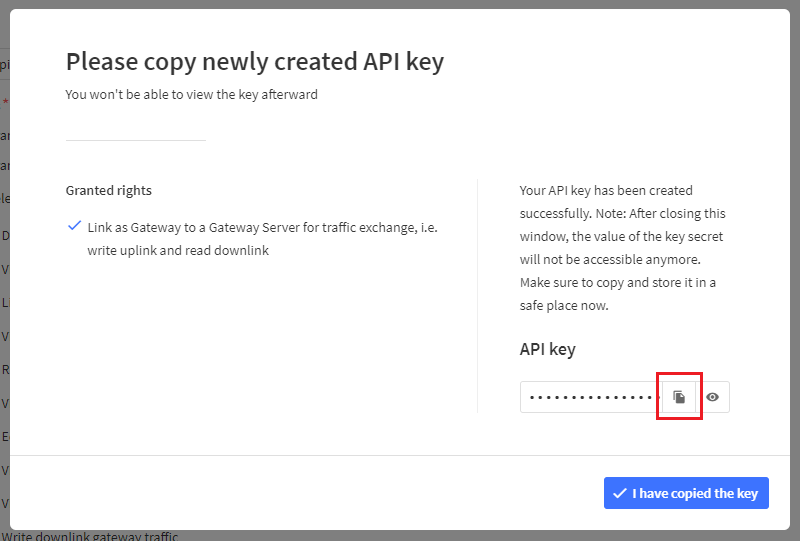
Now you will be given a one time opportunity to copy the key. Click the copy button (highlighted below by the red box) and …

And paste it into the command below (over the xxxx) to create the tc.key file.
export LNS_KEY="xxxx"
echo "Authorization: Bearer $LNS_KEY" | perl -p -e 's/\r\n|\n|\r/\r\n/g' > tc.key
Now start/restart station and your gateway should successfully register.
Starting at boot
If you want to start Basic Station on boot-up, the easiest option is to modify the /etc/rc.local file and add:
/home/pi/basicstation/build-corecell-std/bin/station --radio-init=/home/pi/TTN/reset_gw.sh --home=/home/pi/TTN --log-file=station.log --daemon
The –log-file switch allows us to override the settings in the station.conf file. This allows for the best of both worlds, you can spawn it and have the output sent to stderr for debugging and when it is spawn at boot, logged to file.
Troubleshooting
[RAL:VERB] Station device: /dev/spidev0.0 (PPS capture enabled)
[RAL:ERRO] Concentrator start failed: lgw_start
[RAL:ERRO] ral_config failed with status 0x08
If your concentrator fails to start and exhibits messages similar to above – relating to the Radio Layer (RAL), then you normally have a Hardware SPI communications problem. Check the following:
- Have you reset the SX130x? (This is normally the number 1 issue encountered)
- Is SPI enabled?
- Have you specified the correct SPI device (/dev/spidev0.0)?
- Is the wiring correct, does the LoRa concentrator module have power etc.
[HAL:ERRO] [lgw_start:1105] failed to open I2C for temperature sensor on port 0x39
[RAL:ERRO] Concentrator start failed: lgw_start
[RAL:ERRO] ral_config failed with status 0x08
If you receive the above message on CoreCell gateways, check (using raspi-config) that you have I2C enabled. I2C is used to talk to the STTS751 Temperature Sensor on the CoreCell Reference Design.
[HAL:INFO] [lgw_start:1111] no temperature sensor found on port 0x39
[HAL:INFO] [lgw_start:1111] no temperature sensor found on port 0x3B
[HAL:INFO] [lgw_start:1111] no temperature sensor found on port 0x38
[HAL:ERRO] [lgw_start:1120] no temperature sensor found.
[RAL:ERRO] Concentrator start failed: lgw_start
[RAL:ERRO] ral_config failed with status 0x08
If you receive the message above the libloragw HAL can find the I2C port, but is unable to find the STTS751 Temperature Sensor. On some concentrators (RAK Wireless) the temperature sensor has been omitted. There doesn’t appear to be a switch we can pass to disable this.

The best option so far has been to patch the source file and rebuild: (assumes you are in the basicstation directory)
wget www.beyondlogic.org/patches/V2.1.0-corecell-disable-stts751.patch
patch -p1 deps/lgw1302/platform-corecell/libloragw/src/loragw_stts751.c < V2.1.0-corecell-disable-stts751.patch
make platform=corecell variant=std
Once the patch has been applied and basicstation rebuilt, it should now report a ‘phantom’ temperature sensor on the first I2C address:
[HAL:INFO] [lgw_start:1115] found temperature sensor on port 0x39
[RAL:INFO] Concentrator started (2s469ms)